Wednesday, December 18, 2013

Let it Snow!

With winter break only 2 days away, the energy has taken a physical presence in the room! Thus, it was a perfect time to update my brain tools bin by adding some fun new ones and throwing out some of the old dirty, sticky, well-loved ones. :) I went to this neat PD this year where they talked about the importance of brain tools and having a variety to choose from in your classroom since we as individuals all have different preferences. Even something as inexpensive as a pipe cleaner can be quite effective as a brain tool. Today I went shopping with variety in mind, and I was in luck. I stopped at Target and Michael's on my way home tonight and found some really cool ones! I will use the giant green ball and the long caterpillar in box pictured below as rewards for behavior. Students love getting to use the special brain tool.


The key I have found with brain tools being effective is having clear expectations. The instant a "tool" starts becoming a "toy," the privilege of using one is gone. What constitutes a tool becoming a toy? I spell that out very clearly with my students: throwing it, playing with it and completing no work, talking about it with others, etc. That way, students are set up for success right from the beginning. When it is time to write, students are trained to put their brain tools to the side of their desk, and when they are finished, they can pick it right back up. They love their brain tools and so do I. They work!

Another way I combatted all the "winter break is almost here!!! energy" today was by turning on some holiday jams during snack time while students created snowmen for decorations for our song-a-long we will have as a school on Friday. Check out my cutie-pies' snowmen!


Gotta love pig-tails on a snowman or the rainbow colored body. So sweet. :)

As for all you teachers out there, hang on to your hats for the next two days! We got this!

 photo Katie120_zps8b8e103b.jpg

Thursday, December 12, 2013

Timing is EVERYTHING

Today is December 12th, and as of today, we have totaled 11 and half inches of snowfall this week in good ol' GR. Last year, it took until January 21st to get to this amount. And WHEN has this delightfully delicious snow been falling may you ask? Oh between the hours of 7:30 am and 4:30 pm each day of course. Thus, timing is everything. If this snow had chosen to make its grand entrance during the wee hours of the night at any point, we would have had a snow day or two. Instead, we have had indoor recess, frigid dismissal, and interesting commutes home due to the freezing windchill and nonstop snow. I take that back, it does stop snowing, AT NIGHT. :) Gotta love that whining you hear from all the teachers kids about not having a snow day. Now before I start sounding like a meteorologist, let's talk about what we have been doing all week during this time AT SCHOOL. :)

A few weeks ago, I blogged about increasing the amount of writing my students are doing for math as well as making sure this writing involved rigor and critical thinking. To do this, I created C-E-R (Claim-Evidence-Reasoning) journals for my students, and I am really starting to see my students take flight with this.

Each day, my students respond to an open ended story/prompt by making a claim (What do you think?), providing evidence (What proof do you have to support your claim?), and tying it all together with some reasoning (How does your proof support your claim?). Check out some of their work!


My students were given the prompt, "Carl uses base-ten blocks to represent numbers. He makes the number 72." My students came up with different claims like Carl had 5 tens and 22 ones, or Carl had 6 tens rods and 12 ones cubes. They were using the concept of trading beautifully, and I could hardly stand it when I saw a student make a data table without any prompting!

To download your own copy of the CER template to use, click here.

Now it's time for me to put on the boots and go shovel up some of that snow! :)

 photo Katie120_zps8b8e103b.jpg

Monday, November 18, 2013

Bundle Up!

It's time to bundle up! Literally and figuratively that is. Last night, the temperatures dropped from 65 to 40 degrees outside, so it is officially hat, mitten, and long coat weather. Meanwhile, I bundled up my three writing units into one easy download and for a big discount. Now, three units including detailed lesson plans and all the materials needed to teach each of the writing text types as addressed by the Common Core--personal narrative, opinion, and explanatory/informative writing--come in one package for a total of 9+ weeks of teaching.

To access this bundle, click here CCSS Aligned Writing Bundle: Personal Narrative, Opinion, and Explanatory Units or on the picture below.


Snow is in the forecast for tonight, so I think it'd also be best to get out my boots!

 photo Katie120_zps8b8e103b.jpg

Sunday, November 17, 2013

A Peanut Butter, Honey, and Banana Sandwich

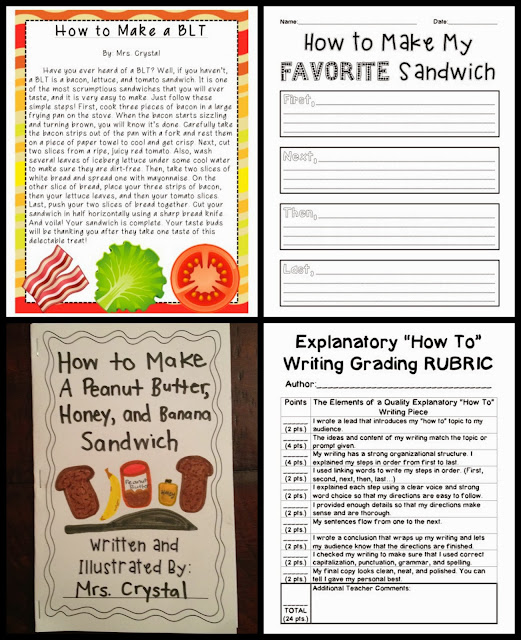
My class is currently in the midst of our explanatory writing unit "How to Make My Favorite Sandwich," and this week, we are going to write our final copies. This forced me to sit down this weekend and make the final copy books that my students will need tomorrow. And a few hours later, voila! The whole unit is now complete.


I had so much fun when I first introduced the unit. I brought into school a loaf of bread, peanut butter, jelly, a butter knife, and napkins. I began the lesson by asking the class, "What are directions?" We built a definition together based on our discussion and wrote it on the board. We came up with, "Directions are a list of steps that you follow to learn something new or to complete a task." Next, we talked about "How do we use directions in real life?" We generated a list on the board: A recipe gives directions on how to cook something, a board game gives directions on how to play it, Legos and models give directions on how to build them, teachers give directions in school on how to complete an assignment, parents give directions on how to do a chore, etc. 

Then, it was time for the fun part! I told students that today, they would be giving me oral directions on how to make a peanut butter and jelly sandwich. I explained to the class that I was a robot and had never made a sandwich before—I could only do what they directed me to do. I got out the bread, peanut butter, jelly, knife, and napkins and had students give me directions one step at a time on how to make the sandwich. I made sure that my students were really SPECIFIC. This is where it got a little entertaining because I only did what students directed me to do. For example, when a student told me to get out the bread, I started to turn the bag over and said that I was going to dump out the whole bag. The student then exclaimed, "No, don't dump out the whole bag! Just get out two slices." I explained that now I knew exactly what to get out and proceeded with pulling only two slices of bread out of the bag. When a student told me to put on the peanut butter without having told me to first open the jar, I tapped the knife against the top of the lid and looked confused. The student quickly clarified that I needed to open the jar by twisting off the top. When a student told me to put the peanut butter on the bread, I put a huge glob right in the center of the slice. Then, I smiled and asked what I needed to do next. The student told me that I had to actually spread the peanut butter; I couldn't just leave it in a big blob. Students of course laughed and found this quite hilarious, but in the end, they were learning how to use specific step-by-step language when giving directions. Of course while students were off into brainstorming and pre-writing, I had to whip up some extra sandwiches to snack on. You can't make a delicious sandwich right in front of a class of 27 seven-year-olds and not let them have a taste!

As we went through the whole pre-writing and then rough draft process, I could see that my little stunt had really paid off. My students were super specific in their language!!

To look at this unit up close, just click here "How to Make My Favorite Sandwich" Common Core Aligned Explanatory Writing Unit or on the picture below!


This unit comes with a detailed 3 week lesson plan, anchor papers to help students see what quality explanatory pieces look like or for the teacher to use as his/her own to model the writing process day-by-day, a "What I Will Need" brainstorming paper, a spelling menu to help students with ideas as well as spelling, several graphic organizers to choose from based on the needs of your students, a rough draft template, a peer revising form, a final copy book template, a "how to" explanatory writing student self-evaluation, a "how to" explanatory writing rubric, and examples of the pre-writing template, graphic organizers, etc. in relationship to the anchor papers to show students as examples or to be used by the teacher as his/her own to model. 


I can't wait to see the finished copies wrap up this week!


 photo Katie120_zps8b8e103b.jpg

Tuesday, November 12, 2013

Math Journal Using C-E-R

Every day, my students begin math with our “Math Journal.” This makes writing about math and critical thinking a normal part of our day. My school uses the Think Math curriculum, and I use what is called the daily Headline Story from the Think Math lessons for students to write about in their math journal. The Headline Stories are basically open-ended statements rather than prompting questions. This forces students to decide,” What can I ask about this story? What can I say about it?” Also, there is usually not just one right answer. My students have gotten really good at coming up with pictures, number sentences, etc. to go with each story, but I have noticed that there is still some reluctance to actually write fully composed sentences about math.


Thus, I have completely revamped my math journal. Today is day 2 under this new format, and I am LOVING it! To increase rigor while at the same time having a structure to act as scaffolding for my struggling students, I use what is called C-E-R.

C=Claim (What are you saying is true?)

E=Evidence (Provide proof, proof, and more proof!)

R=Reasoning (Tie it together—how does your evidence prove your claim?)

So for example, today our daily Headline Story said, “There are more than 10 chicks in the barn. Some are sleeping, some are awake.” Students first had to make a claim (Ex. 8 of the chicks are asleep and 6 are awake). Then, they had to provide evidence (Ex. 8 + 6 = 14). Last, the tricky part, the reasoning! (Ex. There have to be more than 10 chicks, and 6 have to be awake. 8 plus 6 is 14, and that is more than 10. This works!)

Check out some samples below from my Smarties today!


Check out the that reasoning: "I know this because I counted 8 + 6 = 14, and 14 is more than 10 chicks." Bam! I can't help but smile ear to ear when I see students proving their thinking like that!

Here is yesterday’s example…


As you can see, critical thinking is just oozing from this daily routine of following the C-E-R process in our math journal. And on top of that, my students are EXCITED to write about math because they are so all about proving their claim. Win-win.

In terms of production, I bought folders with fasteners at 25 cents a piece. I printed the C-E-R page front-to-back and put 50 sheets in each folder. I then glued a math journal cover to the front of each folder and used Contact paper to make them more durable. I am sure that you have seen firsthand what a student’s desk can do to something that has not been fortified! Anyway, this ended up totaling about $1.00 per math journal. Not too shabby.

If you want to download my math journal cover and C-E-R form, just click here Math Journal Cover and C-E-R Template or on the picture below.


3 rolls of Contact paper, 5 hours, and 30 journals later, I will not be looking at Contact paper for a long time! :)


 photo Katie120_zps8b8e103b.jpg

Monday, November 4, 2013

My Worst OUCH!

OUCH! Bumps, cuts, and bruises are not at all pleasant while they are occurring, but they sure can make for a great story. Plus, all students can relate to this topic because EVERYONE has had some type of ouch happen to them.

My class just wrapped up our "My Worst OUCH Story" personal narrative writing unit, and it was a huge success! We went through the entire writing process starting with brainstorming. This lead me to the depressing conclusion that I have many, many ouch stories to share, and too many of them somehow have resulted from my lack of coordination--Mom, do you remember when you told me I would grow out of that back in sixth grade?? :) I fortunately now see this little talent of mine as a positive because my plethora of incidents can now serve as the basis from which I can help spark ideas for my students. Anyway, this 3 week unit walked students through brainstorming, pre-writing using a sequencing graphic organizer, writing a lead that hooks the reader, developing sentence fluency in the rough draft, creating a concluding sentence(s), revising using a word choice menu (to really add strong verbs, interesting adjectives, specific nouns, descriptive language, and overall improve word choice), peer-revising, editing, self-evaluating, and creating a polished final product. I just uploaded this unit in its entirety to my TPT store. Click on the picture below to access it!


Also, if you want to make your students light up with enthusiasm, at the end of this unit, purchase some crazy Band-Aids for them to decorate their OUCH story with. They will LOVE it. On a side note, I had no idea how many choices there are in terms of patterns, colors, design, texture, you name it when it comes to first aid care. I have been missing out for sure. I ended up buying Band-Aids in neon colors, animal print, and super sparkles. At the end of my unit, my students suggested that I keep the extra Band-Aids that were leftover as unused in my desk drawer in case someone in our class actually got hurt. Can you believe that all of the sudden I had about 5 spontaneous paper cuts occur immediately after I accepted this suggestion? :)


One thing's for sure, there is something about a zebra printed Band-Aid that just makes any ouch feel a whole lot better. :)
 photo Katie120_zps8b8e103b.jpg

Wednesday, October 30, 2013

Frightening Monster Diagrams: A Spooky Nonfiction Text Features Lesson

I along with all teachers across the nation am panicking, dreading, eagerly anticipating tomorrow, October 31st, and all the crazy sugar-high shenanigans that accompany Halloween falling on a school day this year. To prepare for this calm and relaxing day (never!), I wanted to have lessons that keep my students engaged, allow them to release some of their "I can't wait to dress up as __________ (mummy, ladybug, jellyfish, scary masked creature of some sort... you fill in the blank)!!!" energy, and still LEARN.

We are currently studying nonfiction text features, and this week, our focus was on diagrams. My students have been asked to prove their answer when reading a diagram so many times that they are becoming zombies when they use the sentence starter, "I know this because it said on the diagram..." Needless to say, I wanted diagram to become a part of their academic vocabulary. :)

To really make diagrams stick in my students' schema while getting a little spooky, this is the lesson I have planned for tomorrow. I did it with a small group last week during workshop, and it was a HUGE hit!

Diagraming a Monster


1) Read aloud I Need My Monster By: Amanda Noll. (If you haven't read this story before, it's very cute! It's about a little boy who really just wants his own monster, Gabe, who has gone on a fishing trip, to return to his usual spot under the bed. In the meantime, the boy has all of these monsters try to fill in that quite simply aren't scary enough. They come with painted, manicured nails, a bow on a tail, green drool, but they just can't match up to the true terror of Gabe.)

2) Review a diagram (a picture that gives information) as well as labels.

3) Explain to students that today, they will be creating a diagram of their very own monsters. Brainstorm ideas to label on a monster diagram (has eighteen eyes, breathes fire, has a spiked tail, etc.).

4) Model how to draw and label a monster diagram--remind students that this is a diagram, NOT a picture, so you need labels, labels, and more labels!

5) Let students run wild with their creativity as they make their monster diagrams.

6) Have students share their diagrams at the end.

With this lesson in hand and maybe a few Butterfingers, I think I can brave tomorrow! :)


 photo Katie120_zps8b8e103b.jpg

Sunday, October 20, 2013

Listen to Reading and Accountability

Listen to Reading is always a popular choice during reader's workshop, and it is a great way to have students tackle a text that is above their independent reading level and ultimately grow as a reader. My students have just been loving it! However, I want to make sure that my Listen to Reading station is more than just fun but also rigorous. Thus, I have been creating study guide packets to go along with all of my audio book choices so that students have fun AND are building their comprehension skills, expanding their vocabulary, and becoming critical thinkers while they listen to what they are reading.

Since Magic Tree House is a great fit for many of my second graders (and I have the first 10 books on audio cds), I started there with my study guides! At this point, I have created study guides for Mary Pope Osborne's book #1 and #8 in the Magic Tree House series. My plan is to now work to fill in all the stories in between and eventually make study guides for the first 10 books. Maybe more??


Click on the picture below to access the study guide for Magic Tree House #1, Dinosaurs Before Dark.


Here is the study guide for Magic Tree House #8, Midnight on the Moon.


Answer keys are included so that you can monitor your students without having to read each book from cover to cover.  I have also listed the CCSS for 1st-3rd grade that the study guides address.

I have a group of students working with these study guides right now, and I quickly realized I needed to come up with a way for them to keep all their materials organized since it is a chapter book they will be working with for a period of time. I took gallon sized zip-lock baggies and wrote each student's name in permanent marker on the bag. Then, inside the bag, students keep their chapter book with their book mark as well as their study guide packet. This way, each day, their supplies are easy to find and organized. Then, when they are finished, I take the baggies home with me, and they are all there organized and ready for me to grade. It's a system!

 photo Katie120_zps8b8e103b.jpg

Wednesday, October 16, 2013

Word Work

The Daily 5 has been running smoothly in our classroom, and word work has been a very popular choice. I completely revamped my classroom materials this year so that the weekly spelling homework from my Spelling Menu Pack does not overlap with word work activities in the classroom. This is meant to keep both areas fresh and fun. So far, I have introduced 5 different word work choices, and at this point, "Stamp It Out!" has been the most popular. There's just something about getting messy with ink so that I have to pull out the Clorox Bleach Wipes each day that gets students motivated. :)


For "Stamp It Out!" I created a template where students have to write it in pencil, stamp it, then write it again. To download a FREEBIE of this template, click on the picture below!


Another favorite is the "Beads and Pipe Cleaners..."


...as well as the "Scrabble Tiles" (grab the "Scrabble Spelling" Template FREEBIE from That's So Second Grade) and "Rainbow Roll and Write," another awesome FREEBIE from Cupcake for the Teacher! Our fifth word work choice is "How Much Is Your Word Worth?" that math lovers go crazy for.


We will continue to add choices over the next month or so as students have mastered the expectations and routines, but so far, so good!

 photo Katie120_zps8b8e103b.jpg

Saturday, September 14, 2013

Make Spelling Count

Spelling homework has officially started this past week in my classroom as we just wrapped up our second week of school. I love all of my new second graders (you forget how young they are at the beginning of the year!). Since spelling practice can be dreaded by students of all ages, it was important to me this year to make spelling homework truly engaging, interactive, meaningful, and fun. I also wanted to be able to differentiate. Thus, I revamped all of my spelling menus as well as expanded a ton in terms of the types of activities I offered. I also wanted to make my spelling homework completely different from the word work activities we do in the classroom so that all those classroom materials such as pipe cleaners and letter beads, scrabble tiles, wikki sticks, etc. stay fresh. I devoted last Saturday just to this task, and I was able to launch our very first spelling menu on Monday. After I had collected homework and assessed how it went, the votes were in. The "Swirly Words"  activity was by far the most popular choice! For Swirly Words, students have to write their spelling words around a swirl as they move their paper around in a circle. It's a great way to give students that skill and drill practice needed to master the words. To get a copy the Swirly Words template along with my Spelling Menu 1, click on the picture below!

I have decided that I am going to switch up my spelling menus every two weeks, so I ended up making a total of 9 different spelling menus. This will keep spelling interesting throughout the whole year. For the full set of spelling menus, all the spelling activity templates, pre- and post-test printables, and bin and folder covers to keep your classroom cute organized, check out my spelling menu pack on TeachersPayTeachers. Click on the picture below!

Now to enjoy some fresh fall weather! :)

 photo Katie120_zps8b8e103b.jpg

Friday, August 30, 2013

Classroom Reveal!

I think I can finally say my classroom is no longer under construction. And by construction, I mean me organizing the explosion of items that comes along with the territory of any teacher moving into a new room.  It is officially ready for my second graders to arrive Tuesday! Here are some of my favorite parts...


I think I am MOST excited about my college wall! College readiness is a big deal at our school, so I thought, why not expose my students to some choices now and get them thinking, "Class of 2024, where do YOU want to go to college?"


I attempted to be as unbiased as possible, but I realized subconsciously I used maize and blue for my accent colors (HAIL!).  I immediately made up for it by displaying MSU and Ohio State prominently at the top of my columns.

Another favorite of mine is my classroom library. I have an awkward pillar in the middle of my room, but I actually now think it is an advantage. I used a bookcase to cut off access to it, and now it makes my library more enclosed and homey looking!


Also, I am super pumped about my organization this year. I have each book bin labeled by author, genre, topic, etc. and then the best part is that inside the book is a label that matches the bin. No more of me pulling out my hair as I organize misplaced books!

You can probably tell by now that I went the whole Chevron route this year. Because Chevron in every colored border was on backorder, I actually printed out scrapbook paper and cut it myself... Obsessive? Yes. Worth it? Absolutely. :)


Our school studies a moral focus virtue each month, we start with wisdom. The "Knocking My Socks Off!" bulletin board will be used to display student work. Last but not least, I will post expectations on the Daily 5 board as we go through the first 20 days!


A final view. Now to get some good sleep in before Tuesday!

 photo Katie120_zps8b8e103b.jpg

Thursday, August 29, 2013

People Bingo

With school only a few days away, I have been in my classroom busy organizing and preparing bulletin boards,  lesson plans, and community building activities. Since half of my class this year will be returning students and half new students, People Bingo will be a fun and interactive way for my students to get to know one another. For a free copy of People Bingo, just click on the link below!


After students have played the game, I like to wrap up with a "stand up, sit down" sharing out activity. We go through each square on the People Bingo board, and students stand up for "yes" and sit down for "no." This allows students to see what they have in common with others!

It's just a quick blog for today as I have to get back to cutting out laminate (you are probably all to familiar with the back-to-school mounds!). Until next time! :)

 photo Katie120_zps8b8e103b.jpg

Wednesday, July 31, 2013

FREEBIE Brainbreak!

We have all been there before as adults, where you have been sitting an hour, maybe more, listening to a speaker and feel yourself getting sleepy, your brain starting to wander. You begin to think about what color you want to paint your office... "Perhaps that lagoon blue, no the summer sky blue would be better. What would go with the lamp shade the best? Yes, definitely the summer sky blue. I could really go for some breakfast right now. Chocolate chip pancakes, with maple syrup, yum. Oh, and a glass of freshly squeezed orange juice..." And then there are those things on your to do list that you would really like to get done. What did the presenter just say??

We should not be shocked then that the same is true of our students when they sit for a while. They begin to lose steam. I actually went to this workshop on incorporating movement into learning, and it was fascinating to learn about the physical changes that take place in our bodies such as chemical releases when we have been sitting for a period of time. Your body is literally telling you to start relaxing and move towards sleep. The opportunity to move and reenergize is necessary then for high-focused learning, but how do we incorporate brain breaks into a day that is also very much an environment of “time on task?” I believe that “time on task” happens most effectively when there IS an opportunity for physical activity.

Brain breaks thus are great when they allow your students to get out energy AND are educational. That is exactly why I created "Line 'Em Up!" This brain break takes 3-5 minutes, and it is great because it is engaging and educational while giving the students an opportunity to move around and refresh for our next focused activity. It also gives the students an opportunity to work together as a team and collaborate positively. This is a game I like to play during the first week of school to establish brain break procedures as well as help build a strong classroom community. By the middle of the year, students know the drill of the game and look forward to figuring out what the pattern will be! It helps them practice counting skills and recognizing numerical patterns.

Here's how it works:

Goal: The goal of the game is for the students to line themselves up from least to greatest in a straight line without talking! Then, they see if they can figure out the pattern. 

  1. Explain the goal of the game to your class and designate a particular spot in the classroom where students will line up to form their line from least to greatest. Make sure to establish where the lowest number should line up versus where the highest number should be. If this is the first time playing ”Line 'Em Up” model how to communicate with someone about movement without talking. Once the game has been played, review the rules as needed.
  2. Pass out 1 card to each student. The students can look at their card but are to keep the number side hidden until the “Line 'Em Up” process actually starts!
  3. Once all the cards are passed out, students place their card on their forehead with the number side showing. Then, students stand up and walk around the room looking at the other cards on their classmates’ foreheads.
  4. Students must form a line in order from least to greatest. Once the line is established, students have to figure out the pattern.
  5. Call on a student to identify the pattern.
That's it! To download your FREE copy of Line 'Em Up! with 15 different card sets, click on the link below.


Now time to go make something to eat, all that breakfast food talk got me thinking about pancakes! :)


 photo Katie120_zps8b8e103b.jpg